Administration
Localization
Localization settings are configured in the locale section of the homs_configuration.yml config file. Two parameters are available:
- code — locale code for the Hydra OMS interface, you can use one of the two options: English (en) or Russian (ru);
- datetime_format — date and time format, see http://ruby-doc.org/stdlib-2.3.0/libdoc/date/rdoc/DateTime.html#method-i-strftime for syntax description.
If one of the parameters is not defined, its default value is used:
locale:
  code: en
  datetime_format: '%m/%d/%Y %H:%M %p'
Users
Hydra OMS users are displayed in the Users section.

Click the user name to view or edit user data.
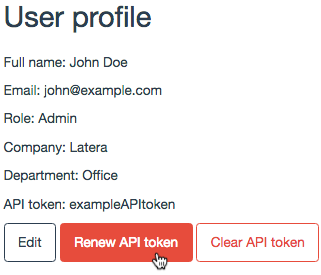
In this section you can also create the API token, which is used as a password in HTTP basic authentication via the application’s API. If the key has been already created, it could be refreshed or deleted.
To work with the orders the user with the identical email address must be signed up to the BPM system.
Order Types
Order Types Configuration
The appearance of the order (the set of user fields) is defined in the YAML-based configuration file. You must create configuration files for every order type and import them to the Hydra OMS.
The structure of a configuration file is the following:
order_type:
  code: orderCode
  name: Order Name
  fields:
    fieldName1:
      label: Some Label
      type: string
    fieldName2:
      …
In order_typeblock the following entities are defined:
- code — the code of order used for interaction with the BPM system,
- name — the name displayed in the interface,
- fields — the list of user-defined fields.
Configuration blocks that define order fields begin with the name (in the example, fieldName1 and fieldName2). When the order fields are sent to the BPM system, the prefix homsOrderData is added to their names in lowerCamelCase style.
The following attributes are defined for each field:
- type,
- label — the name of the field displayed on the form,
- label_css and css_class — CSS classes for the label and the field (bootstrap framework documentation available at http://getbootstrap.com/css/),
- tooltip.
The following field types and their additional attributes are supported:
- boolean — takes the values true or false;
- number;
- datetime — date and time, sent to the BPM system as an ISO 8601 string, bootstrap-datetimepicker is used to display this kind of fields, additional attributes:
- locale — locale for a date, which is set by a letter code, possible values are described here: https://github.com/moment/moment/tree/develop/locale, for example, locale: 'en-gb'.
- format — date format, its syntax description you can find here: http://momentjs.com/docs/#/displaying/format/, for example, format: 'DD.MM.YYYY'.
- string:
- pattern — the following symbols could be used in a pattern: 9 — decimal digit [0-9], a — latin letter or space [A-Za-z ], * — decimal digit, a latin letter or space [A-Za-z0-9 ]. Used for phone numbers, postcodes, document numbers, etc. For example, +1 ({{999}}) {{999}}-{{99}}-{{99}}.
Anchors and links could be used to make the configuration more convenient (allowed by the YAML format). For example, common attributes for most of the fields can be defined at the beginning of the file and then some of the attributes can be redefined in the certain blocks.
common: &common_field_options
  type: string
The link with the name common_field_options replaces the definition of a label and a type in the field description. It can be added to the configuration for each field as the following:
fields:
  fieldName1:
    <<: *common_field_options
For example, the request to the Technical Support Service might look like this:
common: &common
  type: string

common: &common_phone
  <<: *common
  pattern: +1 ({{999}}) {{999}}-{{99}}-{{99}}

order_type:
  code: support_request
  name: Support Request
  fields:
    subscriberFirstName:
      <<: *common
      label: Requester First Name
    subscriberLastName:
      <<: *common
      label: Requester Last Name
    subject:
      <<: *common
      label: Subject
    mobilePhone:
      <<: *common_phone
      label: Mobile Phone Number
    workPhone:
      <<: *common_phone
      label: Work Phone Number
    homePhone:
      <<: *common_phone
      label: Home Phone Number
    emailAddress:
      <<: *common
      label: E-mail Address
In this order user can specify subscriber’s name and last name, subject of the request and subscriber’s contact details: phone numbers and email address. The common_phone pattern is used for the fields with phone numbers that eliminates the need to specify the phone number format for each field separately. The string type is applied to the rest of the fields.
Loading Order Types in the Hydra OMS Application
Click Order Types to view, change, add or remove order types.

Click on the order type name to view its configuration.

To delete a type, click  in the corresponding line.
To add a new order type, click Browse and select the file with the required configuration. Then click Upload. If it is necessary, you can cancel your choice by clicking Remove.

Check the configuration after uploading. If it is correct, click the Activate button to make a new order type available. Otherwise, click Dismiss.

The new version of the order type configuration is applied only to newly created orders. Previous orders (created before you activate a new configuration) are linked to the versions that were active at the moment these orders were created.
Business Processes
Working with business processes required the following components:
- the Activiti BPM system (installation guide: http://www.activiti.org/userguide/#activiti.setup),
- Eclipse IDE with Activiti Designer plugin to create the config files (detailed instructions on installing the plugin: http://www.activiti.org/userguide/#eclipseDesignerInstallation),
- Hydra OMS.
The mechanism of the business processes is defined in the BPM system. Here you can find the detailed documentation on the Activiti platform features: http://activiti.org/userguide/. The system consists of two applications: Activiti REST and Activiti Explorer. Both of apps contain the same copy of the Activiti Engine kernel and must be configured for working with a common database.
Activiti REST provides a REST API for interacting with the BPMS and other systems (including the Hydra OMS).
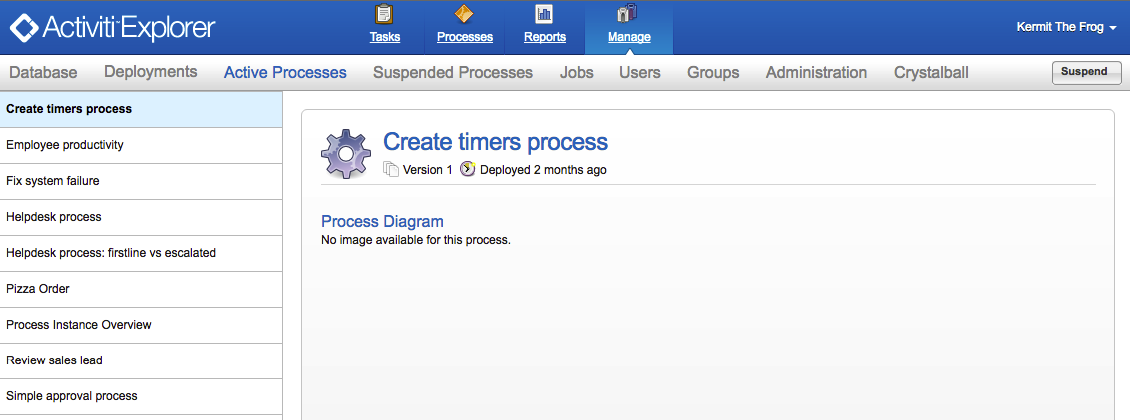
Activiti Explorer provides users with a simple web interface for working on tasks. The system administrator has access to view the running business processes, monitor system kernel and performed tasks, view the database tables and logs, and generate reports.
Business Process Configuration
The logic of the business process is set in the configuration files in accordance with the BPMN 2.0 specification (in XML format). The Eclipse IDE together with the Activiti Designer plugin allows you to create and edit the process flow scheme in graphical mode.
For example, let’s consider the business process for the vacation request handling that comes from an employee to a manager.

The employee fills the order creation form or sends data via the API from another system. The following information is sent to the manager:
- first day of the vacation,
- last day of the vacation,
- cause of the request.
A new order is created in the system and it must be considered by a manager. If the manager approves the request, the employee will receive email notification; otherwise, the request should be resubmitted and can be rejected or sent to the manager for revision.
The start of a business process is denoted by the icon  , and its completion by the icon
  . To organize multithreaded and branching processes you can use the “gateways” (in this example — exclusive gateway denoted by the icon
  ).
).
Business process diagram basically consists of blocks of two types: Script Task and User Task. The Script task blocks define automatic system response to the events of preceding stage of a business process.
These kind of blocks are denoted on the diagram by the icon  .
.
User task blocks require user action and are represented by the icon  .
.
There is also a Mail Task block (denoted by the icon  ) responsible for email notifications.
To limit the execution time of a task, you can use the timer. If the task is not completed after the specified period, the process will go to the next step defined by the timer.
The important feature of the BPM system is that all the processes are restored after the server reboot. The system continues to monitor the timers and execute all active processes.
You can find more information about the capabilities of the Designer plugin for Eclipse at the Activiti website: http://www.activiti.org/userguide/#eclipseDesignerBPMNFeatures.
Business process settings and block settings are displayed on the Properties tab. The parameters of the process are the following:
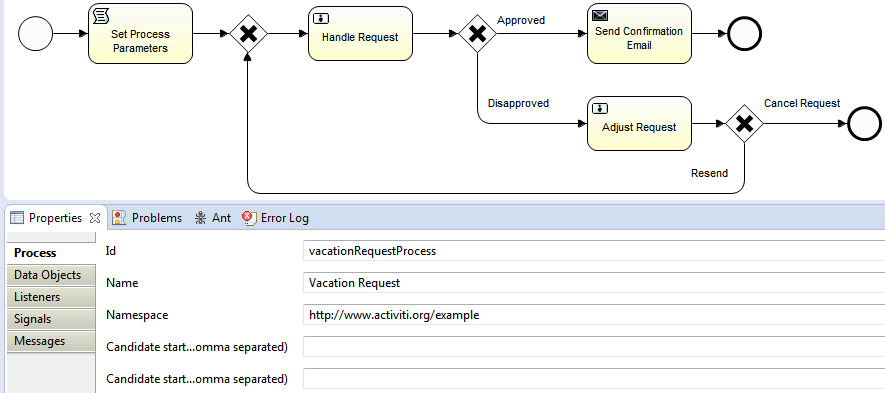
For each type of block different settings are available in the Properties tab. For example Set Process Parameters block of the Script Task type has parameters required to integrate BPM system into the Hydra OMS in the Main config section.
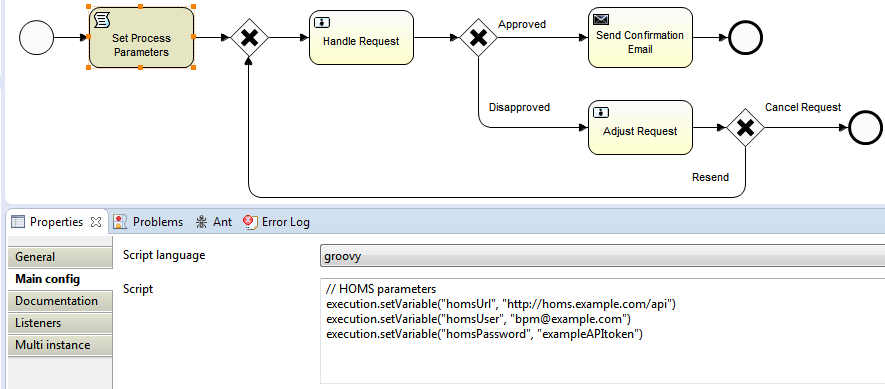
Here the BPM system call to Hydra OMS is occured on behalf of the user with the email address bpm@example.com, and API token that was generated for the same user in Hydra OMS (see the Users section) is used as the password.
At the next block of business process (the Handle Request task) the Assignee field points to a user who started the process at the previous stage. The name of this user is assigned to the special variable initiator. It is sent via the BPM widget on the start of the business process.
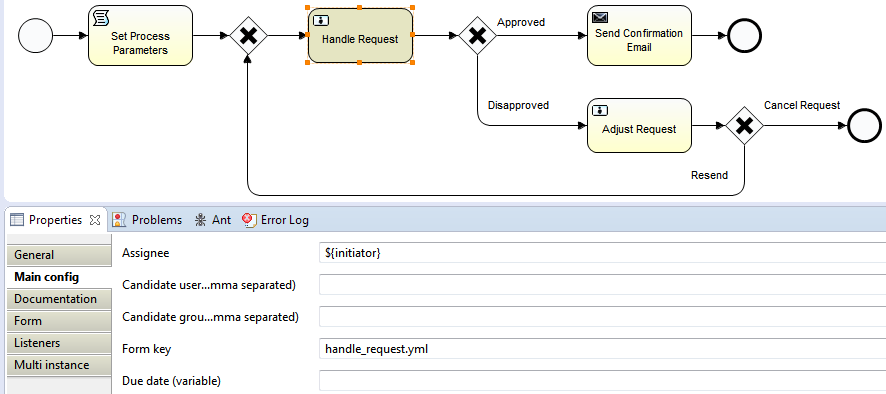
In the Form key field you should specify the configuration file which determines how the user task will look like in the BPM widget in the Hydra OMS interface.
The Script Task type blocks are used for executing code. In the block settings located in the Main Config section you should specify a language (Script Language) and place the code in the Script field.
All changes in orders status and data are tracked by listeners. Event Listeners track all the events at the global level (at the level of business process). For example, they can mark the beginning and the end of blocks. Event Listeners are defined by the business process configuration.
When you set up certain blocks of a business process you should use listeners that track task execution (Execution Listeners). They track and handle events related to the execution of a given task.
The following listeners (Java classes) are used with the Hydra OMS:
| Name | Type | Description |
| org.activiti.latera. |
Execution | Initializes process logging. |
| org.activiti.latera. |
Event | Fills previously initialized logs with the information on occured event. |
| org.activiti.latera. |
Execution |
|
| org.activiti.latera. |
Execution |
|
| org.activiti.latera. |
Event |
Automatically saves order fields:
Thus, the autosave process does not create excessive load on the Hydra OMS API. |
| org.activiti.latera. |
Execution |
|
Here you can find the library with the listeners and instructions for adding this library to the Activiti: https://github.com/latera/activiti-ext. To use the listeners in your project, you need to add the Activiti Designer extension together with the library. You can follow the instructions here: http://www.activiti.org/userguide/#eclipseDesignerApplyingExtension.
To add global events listeners you need to enter them manually in the business process configuration after the line with the project title:
[…]
  <process id="transformationRequestProcess" name="Transformation Process" isExecutable="true">
     <extensionElements>
      <activiti:eventListener events="ACTIVITY_CANCELLED,ACTIVITY_COMPENSATE,ACTIVITY_COMPLETED,ACTIVITY_ERROR_RECEIVED,ACTIVITY_MESSAGE_RECEIVED,ACTIVITY_SIGNALED,ACTIVITY_STARTED,ENTITY_ACTIVATED,ENTITY_CREATED,ENTITY_DELETED,ENTITY_INITIALIZED,ENTITY_SUSPENDED,ENTITY_UPDATED" class="org.activiti.latera.bss.eventListeners.EventLogging"></activiti:eventListener>
      <activiti:eventListener events="ACTIVITY_COMPLETED" class="org.activiti.latera.homs.eventListeners.AutoSaveOrderData"></activiti:eventListener>
    </extensionElements>
[…]
You can add listeners to particular business process tasks by utilising the graphical mode of the Activiti Designer. This step requires locating the Listeners section in the Properties tab and clicking New. In addition, you should define the Java class type and select the appropriate listener. Conditions for the listener’s trigger (start — at the beginning of a task or end — at the end) can be specified in the Event field of the Listener configuration window.
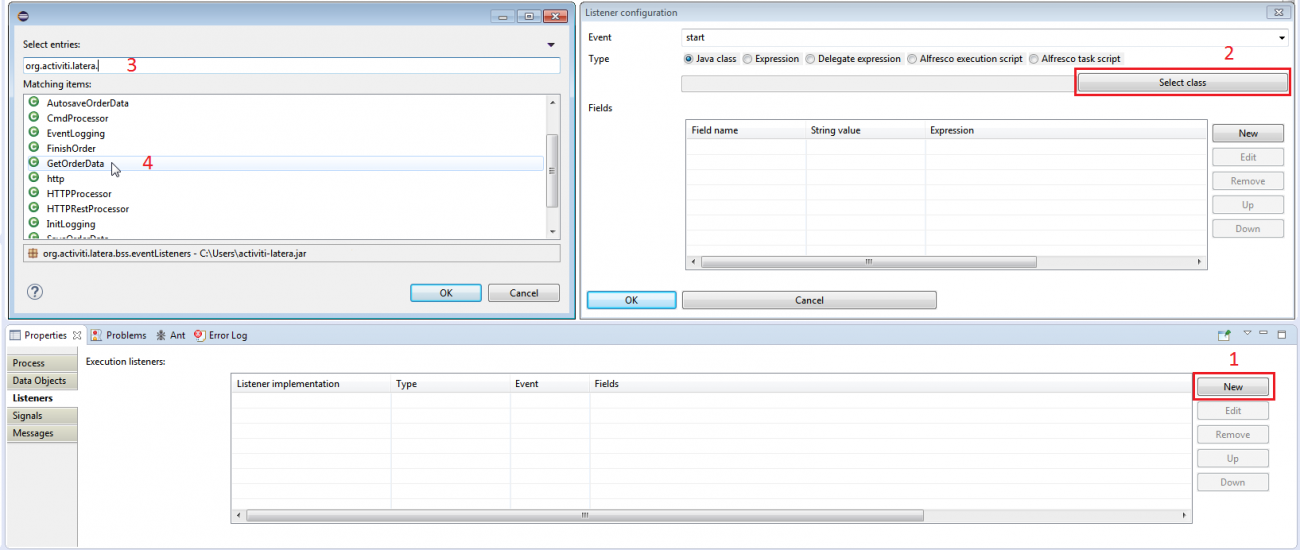
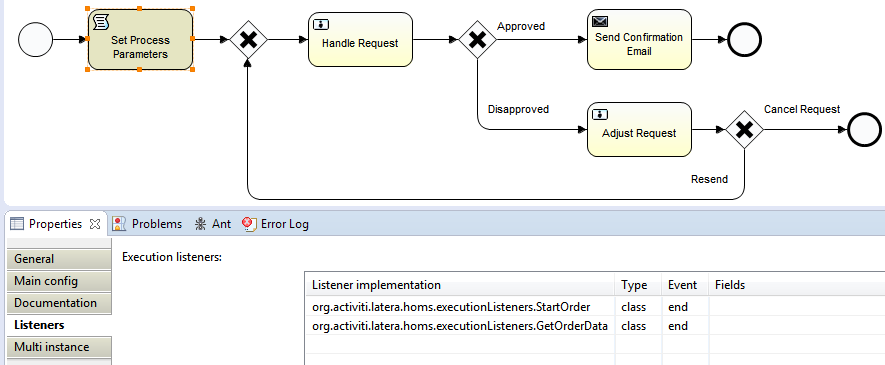
In this example, there are two listeners used for the Set Process Parameters task. The first is responsible for starting a business process for handling the order, and the second one gets the order data.
User Task Forms Configuration in the BPM Widget
The appearance of the user task forms in the BPM widget is defined in the configuration file (YAML format).
Forms contain fields and buttons with different resolutions. The following attributes set is available for each form field in the configuration file:
- name — the name corresponding to the order field name in the order type configuration with the prefix homsOrderData and lowerCamelCase style;
- type;
- label — field name displayed on the form;
- css_class — field class; form generation requires Bootstrap, its standard CSS classes description can be found here: http://getbootstrap.com/css/#grid;
- editable — can be edited by a user.
The following field types and their additional attributes are supported:
- checkbox — imported into the BPM system as boolean;
- group — defines a subgroup of fields:
- fields — list of fields;
- datetime — date and time; imported into the BPM system as a string in ISO 8601 format; this attribute type requires bootstrap-datetimepicker project.
- locale — date locale, set by letter code with values described here https://github.com/moment/moment/tree/develop/locale, for example, locale: 'en-gb';
- format — date format, syntax description can be found here http://momentjs.com/docs/#/displaying/format/, for example, format: 'DD.MM.YYYY'.
- select — dropdown menu with a list of choices, value is imported into the BPM system as an ISO 8601 string:
- choices — the static list of available values;
- data_source — the name of the data source in the Hydra OMS configuration file sources.yml which is used for generating the dynamic list of values; you can use any ORACLE database as a source, for example, this sources.yml file contains one source — billing:
sources: billing: type: sql/oracle tns_name: hydra username: AIS_RPC password: ais_rpc_password - sql — SQL request for values list from the source specified in data_source. Here is the example of the SQL request that returns a list of services for a customer with specified ID:
SELECT N_SUBSCRIPTION_ID,
       VC_SERVICE
FROM   SI_V_SUBSCRIPTIONS
WHERE  N_CUSTOMER_ID = :homsOrderDataBillingCustomerId
AND    N_PAR_SUBSCRIPTION_ID IS NULL
ORDER BY VC_SERVICE
First column in the resulting set must contain choice ID (service subscription ID in the example), second column — value, displayed in a dropdown menu (service name).
- mode — available values: lookup and select;
- nullable — the ability to set null values, available values: true and false;
- placeholder — displayed instead of an empty value;
- static — used for HTML code output:
- html — code displayed to user (rendered);
- string
- pattern — the following symbols could be used in a pattern: 9 — decimal digit [0-9], a — latin letter or space [A-Za-z ], * — decimal digit, a latin letter or space [A-Za-z0-9 ]. Used for phone numbers, postcodes, document numbers etc. For example, +1 ({{999}}) {{999}}-{{99}}-{{99}}.
- submit_select — buttons with choices combined with form submission; imported into the BPM system as an ISO 8601 string:
- options — list of choices with additional attributes:
- name — button name displayed in the interface;
- value — value to be written into the corresponding order field on the button click;
- css_class — button container class defined in the Bootstrap framework documentation (http://getbootstrap.com/css/);
- fa_class — button icon class defined in the documentation of the Font Awesome library (https://fortawesome.github.io/Font-Awesome/icons/ library).
This field is always defined at the end of the configuration. If it is not specified, standard Submit button will be used to go to the next task of the business process.
- options — list of choices with additional attributes:
- text — expanded text field:
- rows — number of rows.
Let’s consider the Adjust Request task configuration:
form:
  name: Adjust Request
  css_class: col-xs-12 col-sm-6 col-md-5 col-lg-4
  fields:
  - name: group1
    type: group
    label: Request Resolution
    css_class: col-xs-12
    fields:
    - name: homsOrderDataResolutionText
      type: text
      rows: 3
      label: Resolution
      css_class: col-xs-12
      editable: false
  - name: group2
    type: group
    label: Request Data
    css_class: col-xs-12
    fields:
    - name: homsOrderDataBeginDate
      type: datetime
      label: Begin Date
      css_class: col-xs-6 col-sm-4 col-md-3
      format: DD.MM.YYYY
    - name: homsOrderDataEndDate
      type: datetime
      label: End Date
      css_class: col-xs-6 col-sm-4 col-md-3
      format: DD.MM.YYYY
    - name: homsOrderDataMotivationText
      type: text
      rows: 3
      label: Motivation
      css_class: col-xs-12
  - name: homsOrderDataAdjustResult
    type: submit_select
    css_class: col-xs-12
    options:
    - name: Resend
      value: Resend
      css_class: btn btn-primary
    - name: Cancel Request
      value: Cancel
      css_class: btn btn-danger
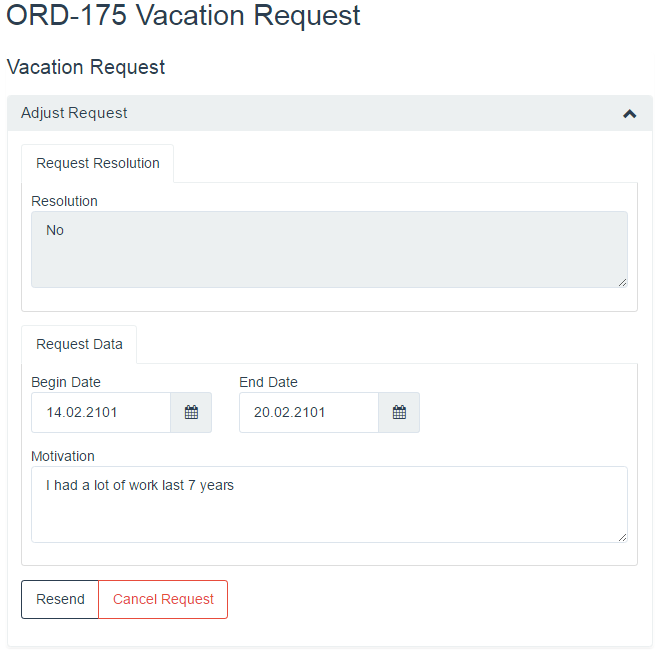
Here the Adjust Request form is created. It includes the two groups of fields — Request Resolution and Request Data — and two buttons for current task completion and moving to the next step of the process.
The Request Resolution group contains a single text box displayed as Resolution. It has three rows and it can not be edited at this stage.
There are three fields in the second group: requested vacation start date, end date and a motivational text.
The last part of the form contains buttons available to the user: send the form again (Resend) or cancel the request (Cancel Request). The homsOrderDataAdjustResult variable takes the corresponding value depending on the selected button: Resend or Cancel. Based on this, the business process goes to finish or re-task a Handle Request (see business process diagram).
As a result, user sees this form:
Loading Configuration Files into the BPM System
To ensure all the upcoming business processes start with the configuration defined above it’s required to import it into the BPM system. Go to the Manage section in the Activiti Explorer and choose Upload new at the Deployments tab.
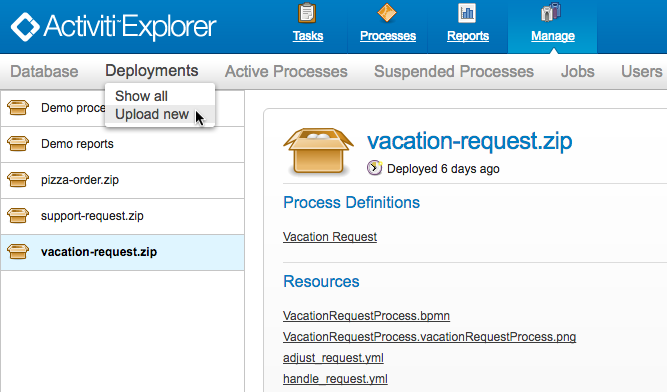
Then choose ZIP archive containing the configuration of the business process in BPMN format and the corresponding forms configuration in YAML format. All files should be located strictly in the root of the archive.
The process you’ve just loaded will be displayed at the Process Definitions block and the configure files — at the Resources block.
Activiti BPMS allows you to upload new versions of the existing business processes configuration. Please note that the configuration for the certain process is fixed at the moment of its launch — new versions will not affect any running processes.
Business Process and Order Types Matching
The Hydra OMS widget configuration stores available business processes description and order types matching in hbw.yml file. See the following example:
hbw:
  bp_toolbar:
    entity_type_buttons:
      vacation_request:
        - name: 'Handle Vacation Request'
          title: 'Start handle vacation process'
          class: 'btn btn-default'
          fa_class: 'fa fa-user'
          bp_code: 'vacationRequestProcess'
      transformation_request:
        - name: 'Handle transformation request'
          title: 'Start handle transformation request'
          class: 'btn btn-default'
          fa_class: 'fa fa-exchange'
          bp_code: 'TransformationProcess'
The hbw key (Hydra BPM Widget) defines the beginning of widget configuration.
bp_toolbar block describes business process start buttons (entity_type_buttons) for each order type. Buttons have the following attributes:
- name — text displayed;
- title — tooltip text;
- class — button container class; standard CSS classes are available in the Bootstrap framework documentation: http://getbootstrap.com/css/#buttons-tags;
- fa_class — button icon class; the list of icons and classes documentation: https://fortawesome.github.io/Font-Awesome/icons/;
- bp_code — business process program running on button click.
The order form with the transformation_request code displays one button with the text Handle transformation request. The Start handle transformation request tooltip is displayed on hover. The class attribute defines default button form and the  icon (fa-exchange). The TransformationProcess starts on button click as transformation_request order is being processed.
